I wrote this snippet back on April 27th. I decided to hold off on posting it to see if there would be any 'fruit' to the changes that I knew I was going through way back then. So far my mower is sweet, I built a six foot privacy fence around our yard, and I have eaten meat about once a week instead of every day! I feel great, I've lost some weight, gained some muscle, and feel like I can conquer the world!
So read on and see what I was thinking 2 months ago:
Something is happening to me fellow followers. The influence of my Precious Beauty is having a major effect on this Nuevo Mexicano. When she set her sights on getting our weekly trash widdled down to fit inside a glove compartment, I secretly snickered and thought, "Yeah, O-K." Then, to my surprise, the next week we had a little baggie of trash; it was so tiny, the trash dudes glanced at that pitiful bag and moved onto their route leaving our sorry bag on the driveway. You can read all about it here.
Taking her lead, I decided this weekend to retire my riding lawn mower for a Scotts Classic Reel 20 incher. Not because of the toxic emissions of my Briggs Stratton 6 HP Beast or the skyrocketing price of gas, mind you, I just wanted to see if I could do it. I mean if my Pretty Little Red-haired girl can do the trash thing, then surely I could do this. Cutting my lawn has never been more fun! Plus, I got some exercise in the process, sweet deal!
So let's see where this greener approach to life takes us shall we? Our garden is thriving and doing great. I guess if I am going to go full tilt into this though, there is the question about what to with the StangBeast. Any takers?
Monday, April 27, 2009
Thursday, April 16, 2009
Giving food to the beast within
Pre-restoration Autolite 2100


Whether or not you can admit it, you have a beast within: A certain inner being striving for excitement or excellence, straining to reach the surface from the black abyss below. And so it is the for the StangBeast. When I would drive this car it didn't feel right. I understood this was no 440 with 650HP but c'mon, it's a stang, and I wanted to tap into her inner heart with utter desperation. When I would romp on the pedal there was no metal connecting to my foot. It was very disheartening when, after I rebuilt the carb and replaced the intake gaskets, she still seemed like a tamed donkey rather than a roaring, raging, beast of power. I had replaced the blown-up 25 year old plug wires with new Taylor 8mm wires. Put on a new distributor cap and rotor. Replaced the worn points with electronic ignition including a new coil. There had to be some life inside this animal and I was determined and destined to find it.
I searched my options to find the best way of tapping into the beast. I contemplated replacing the engine entirely with a new 302 with 350HP drop shipped to the house and ready to rock. It would come completely assembled in the box, just throw it in and turn the key. I was mere inches away from this option when I remembered reading about Pony Carbs. They are a shop out in NM, my homeland, that specializes in carburetors. I decided to send my carb off to them and if that didn't help me, I knew a new engine was next, and last, on the list.
So neatly packaged, my carb left for its journey to New Mexico, a full restoration treatment on the menu. It was a short 2 weeks before I got my carb back which was ok since it was mostly rainy and snowy during that time; not a chance I'd be taking the stang out for a ride. I got a call when the carb arrived at Restoration Destination and was a little shocked when Jon told me that my carb was actually off a '67 Galaxie! He reassured me that it was no biggie and that he'd have my carb fully restored, plated, and run-tested, in a week and shipped back home.
Sure enough, my restored carb arrived. My postman, Dean, who regularly drools all over my car, peeking through the garage window, and telling me all about the Mustang he had but sold blah blah blah. Poor dude. Anyway, he rapped on the door, excitedly handed over my box and a few minutes later came back to my house asking if he could look at it! He was just as blown away as I was to see the newly restored carb.
So on to the before and after photogs. The moral of this blog is tell you "go ahead and feed that inner beast". Give it some food. I am not talking about the beast that causes you to stumble and fall and fail. I'm talking about the one that gives you adrenaline to run that last mile, the one that offers creative inspiration to write that new song, or paint that fresh new painting, or helps you speak in front of a large audience for the first time. Go ahead and be successful! Tear it up! Knock it out of the park! Burn rubber! Live Your Life!


 Restored riser plate
Monday, April 13, 2009
Intake gaskets and then Carburetor restoration
When my ride came out sweeter than "honeysuckle on the vine, Ma" I made the precarious decision of doing a little sumpin', sumpin to my engine. I noticed a little drop or two of oil when she sat in the garage over an extended period of time and I wanted to find out the source of the leak and eradicate it.
The level of expertise you will need to tackle this job is pretty minimal. To get access to all of the bolts you must remove the carburetor. Start by removing the air cleaner and all the rubber hoses from the carb. Unscrew the hot air choke tube that attaches to the the choke. Four nuts secure the carb to the manifold and then you are home free. Well almost.
You will need a 1/2" socket and a pry-bar for the intake manifold. There are 12 bolts holding that beast down and once you get those out you will need to pry it off and out. I used a 2x2 piece of wood that I use for tire chocks and beat against it with a hammer. A few grunts and slams with the hammer and the manifold should come loose. If you go the prying method be careful not to gouge the lip on the block or you will be royally screwed.
The intake weighs some poundage, but if you are not a girlie-man you should be able to man-handle it. (I say this under the full realization that there are some girls out there that can knock my lights out, so take this for what it is, a pun, and move on) If you need help, grab your buddy or buddette and you should be good to go. I actually faced the engine from the front and climbed into the engine bay. That's the beauty of the Mustang, you can get right in and close the hatch then pop out like a jack-in-the-box to scare anyone who dares pop the hood. It's pretty fun, you should try it.
So using my legs against the frame rails for support and pulling up with super-human strength the intake finally gave in and came to papa. I put the heavy metal beast on my lap and swung my legs out of the bay. I used oven cleaner on the outside of the oily intake and cleaned it up pretty well. Then I focused my attention to the gaskets on the block side. I used a razor blade and scraper to get all of the old gasket off and get the block thoroughly ready for new gaskets.
Another thing to mention is that I did remove the valve covers for convenience sake. I needed the extra room and eight bolts each is a small price to pay for a dented or bent valve cover. Oh and another thing or three that slipped my mind are the distributor, thermostat, and radiator hose. Just leave the wires on the distributor cap, pull it off and move it out of the way. Be sure to mark it first so you will know exactly how to position it on the reinstall. Unless of course you are a timing genius and do not need to know how it needs to go back in. Frankly, I am not a timing whiz so I marked mine on the inside of the distributor and on the engine brace.
Closing remarks, take your time. Patience is a virtue and if you are patient you will complete this project successfully. Use plenty of lighting. Use rags or shop towels to cover the open intake hole and over the open block once you get the intake off. Any bolt dropped or foreign debris entering into the block area will be detrimental to your engine. I used two different types of gasket sealer. Blue for the left and right lip edges and black for the front and rear lip edges. Let it cure for 24 hours if you can and be sure to repeatedly retorque the intake bolts every month or sooner.
Now on to the picture show! Thanks for coming! Be sure to subscribe to my new RSS feed. Next time we'll rap about the carb restoration. Rock on peeps!
 Carb is off and intake is sitting pretty waiting to come off
 Closeup of the intakes, block these with rags
 You will find more than you would ever wish for under that intake


 Don't let any foreign objects in this area; bolts, old gasket pieces, etc
The level of expertise you will need to tackle this job is pretty minimal. To get access to all of the bolts you must remove the carburetor. Start by removing the air cleaner and all the rubber hoses from the carb. Unscrew the hot air choke tube that attaches to the the choke. Four nuts secure the carb to the manifold and then you are home free. Well almost.
You will need a 1/2" socket and a pry-bar for the intake manifold. There are 12 bolts holding that beast down and once you get those out you will need to pry it off and out. I used a 2x2 piece of wood that I use for tire chocks and beat against it with a hammer. A few grunts and slams with the hammer and the manifold should come loose. If you go the prying method be careful not to gouge the lip on the block or you will be royally screwed.
The intake weighs some poundage, but if you are not a girlie-man you should be able to man-handle it. (I say this under the full realization that there are some girls out there that can knock my lights out, so take this for what it is, a pun, and move on) If you need help, grab your buddy or buddette and you should be good to go. I actually faced the engine from the front and climbed into the engine bay. That's the beauty of the Mustang, you can get right in and close the hatch then pop out like a jack-in-the-box to scare anyone who dares pop the hood. It's pretty fun, you should try it.
So using my legs against the frame rails for support and pulling up with super-human strength the intake finally gave in and came to papa. I put the heavy metal beast on my lap and swung my legs out of the bay. I used oven cleaner on the outside of the oily intake and cleaned it up pretty well. Then I focused my attention to the gaskets on the block side. I used a razor blade and scraper to get all of the old gasket off and get the block thoroughly ready for new gaskets.
Another thing to mention is that I did remove the valve covers for convenience sake. I needed the extra room and eight bolts each is a small price to pay for a dented or bent valve cover. Oh and another thing or three that slipped my mind are the distributor, thermostat, and radiator hose. Just leave the wires on the distributor cap, pull it off and move it out of the way. Be sure to mark it first so you will know exactly how to position it on the reinstall. Unless of course you are a timing genius and do not need to know how it needs to go back in. Frankly, I am not a timing whiz so I marked mine on the inside of the distributor and on the engine brace.
Closing remarks, take your time. Patience is a virtue and if you are patient you will complete this project successfully. Use plenty of lighting. Use rags or shop towels to cover the open intake hole and over the open block once you get the intake off. Any bolt dropped or foreign debris entering into the block area will be detrimental to your engine. I used two different types of gasket sealer. Blue for the left and right lip edges and black for the front and rear lip edges. Let it cure for 24 hours if you can and be sure to repeatedly retorque the intake bolts every month or sooner.
Now on to the picture show! Thanks for coming! Be sure to subscribe to my new RSS feed. Next time we'll rap about the carb restoration. Rock on peeps!
 Carb is off and intake is sitting pretty waiting to come off
 Closeup of the intakes, block these with rags
 You will find more than you would ever wish for under that intake

 Don't let any foreign objects in this area; bolts, old gasket pieces, etc
Friday, April 10, 2009
Finished Restoration


Finally we have reached the end of the path for this restoration journey. Here are some final pics. Feel free to scroll down this blog to see how we got here!
Let me know what you think. I will let these pics speak for themselves.
Tuesday, March 24, 2009
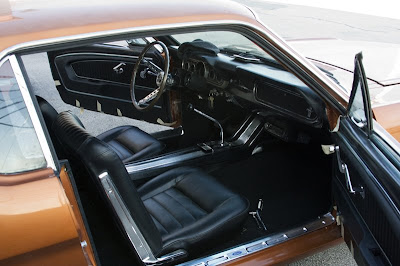
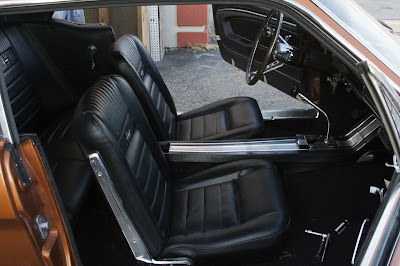
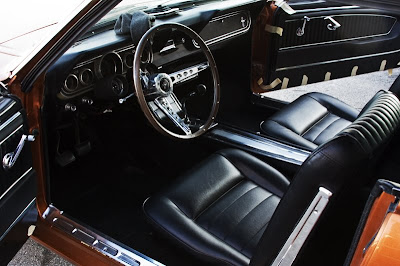
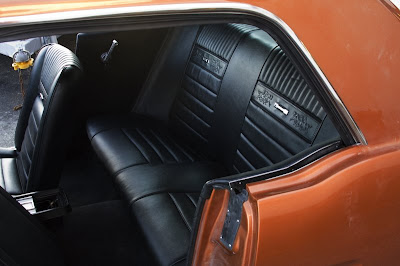
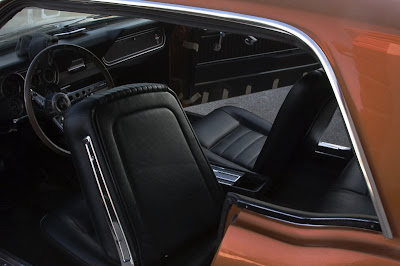
Carpet, Seats, Interior
First I want to thank you for coming back to check out my Mustang restoration. We are almost at the end of our journey here but please come back to see what else might be on the agenda for this blog.
Ok, here you can see the installed carpet kit and the newly covered seats with pony trim. The door panels are on and the window and weatherstrips seals are installed. We are almost ready to take her down the road for a long awaited cruise.
The carpet kit was pretty straight forward. Lay it out in the sun to allow it to relax and unfold. Doing so will make installation easier. I used an industrial strength carpet spray adhesive on top of the sound deadener. The carpet was pressed into place starting from the rear seat area and moving forward.
Then the seats were installed using an awl to find the holes from under the car. Pretty easy. The hardest part was trying not to scratch, scrape, rip, or tear anything.
On to the pics and I will post some last follow up pics of my car completed.


Tuesday, March 17, 2009
Sound Deadening to the Gluteus Maximus
Now get ready for a modern marvel of advanced engineering. Imagine how sweet it'd be if these cars shipped with this stuff. So you might be tempting yourself to call this Dynamat because you've heard of it and you think they are the only ones clever enough to make this stuff. Well, let me enlighten you. Because my restoration budget did not facilitate spending $250 for a square foot of Dynamat, I harnessed the power of the web and found something just as good at significant cost savings. After doing my research I found this stuff at $14 for a 25' x 6" roll. The savings, I decided, would mean that I'd have to do more work, but as you may or may not be able to decipher by now, I'm always game for some real work.
Armed with my handy-dandy electrician scissors and a razor knife (don't use regular scissors on this stuff, you'll dull them out and trash your hands in an instantaneous instant) I charged up that great mountainous beast and laid down the law! I even went a step further and added some pieces of yute backed material under the front and rear seats. Take a close peek at the last two photogs.
Sound deadenation (yes, it's a word now) has been realized to signficant audible suppression detection spanning the full audio spectrum. Whatever than means. In layman's terms, I could tell the difference between before and after. So much so that I would recommend this upgrade if you are considering doing this to your vehicle. It will work on any type or make or model of car and you will be very happy with the results. In addition, if you are the person that drives a "boom-boom car" that does more rattling than boom-booming, use this stuff. You will be happy and so will we and so will your car.
Feast your eyes, take a peek, send me a question or comment.


Monday, March 16, 2009
Tackling the innards - Part 2
Once your floor and trunk (inner gardens) have been rust treated (weeded) we are ready to introduce our best defense against rust (pests). The beauty of what you are about to see is not, contrary to popular belief, the sweet, rich, black bedliner material that we sprayed. It is the fact that you will probably be good to go with this setup for another 44 years. That will make me 79 and so I sincerely hope that computers will progress at the rate that they have been so we don't have to do so much typing just to get a blog post done. Perhaps we will be able just to think our thoughts and BAM! your post will be written out, photogs uploaded, and spell checked in an instantaneous instant. Yeah, would be FAST!
The bummer about this spray-on bedliner is that you can't spray your own innards to keep them rust free for years to come. But alas, that is a whole other blog subject for a later date.
Ok, back to the task at hand. Thinned out spray-on bedliner was applied to the entire floor and trunk. This liner helps prevent water penetration, it seals the bare metal floor from the elements, and it will provide a layer of sound resistance between you and the road. Benefits abound!
But come back to watch me take this beast to a whole 'nuther level. I am a post away of showing you what real sound deadening is all about. Hang in there, we are almost to those sweet seats, carpet, and of course, the first ride down the open road!
And now on to the pics!


Wednesday, March 11, 2009
Let's tackle the innards now
Ok, we have the outside of the dish pretty clean and tight, now we aim our sights for the inside. If you've been following this project you will recall how much time and energy was spent getting the outside to shine. Well, the inside is even more difficult than the outside. See, the outside can always be washed and waxed and made to look like new fairly easy. But the inside is a more complex task. You can't just go in and treat the rust and holes without doing some major work. Just think about the seats and the carpet and the console; all have to be removed to access the inside. So your work here is more precise and takes patience and meticulous attention to detail to be done right. Take your time and cultivate this garden, your rewards will be great compared to the work you put in.
After replacing the small floorpan behind the passenger seat it is sealed with seam sealer. Every rusty looking spot is brushed with rust-sealer and the whole floorpan is prepped for spray-on bedliner. The trunk had underlayment that was glued to the metal so armed with a razor blades and a can of adhesive remover the trunk was prepped for the bedliner treatment.
Take a gander at the photogs and see that the floor is prepped and ready to be sprayed. Come back to see the rest of the interior come into shape. Slowly but surely we will get it done!


Monday, March 9, 2009
Cleaning up the dish
This restoration journey has been awesome for me to repeat to you. Although this was started in November 2008 and finished just after the New Year, I feel like there are some emotions I didn't fully experience being in the middle of the mix. Now that it's over (a restoration project is never over, by the way) and my stress level has come down, it has been a real treat telling you my story.
About the title of this post: There was a very wise dude who said, "you clean the outside of the dish but on the inside it's full of leftover food, and mold, and dirt." Ok that's not verbatum but you get the idea. Imagine if I took the StangBeast and just cleaned it up on the outside but left the inside all rusty and dirty? That would not be cool... at all. I mean what would be the point of that? To show everyone a nice outside paint job? Hmmm.
So here we go, a few final pics of the outside of the dish before we get to that moldy part I was talking about.


Friday, March 6, 2009
In between layers of color


I mentioned in an earlier post that there were two coats of color and four coats of clear but I failed to mention all that over a coat of primer and another coat of primer-sealer. In between each coat of paint/primer/sealer there is a significant amount of work to be done.

Sanding, wet sanding, and sanding, wet sanding over and over and over and over. By the end of this segment you should be feeling like Daniel Laruso did in that movie when he washed and waxed those sweet antique cars.
So this is what your car looks like in between coats of color. What? You were expecting it to be all shiny and glossy, perfect and ready for the show circuit huh? Not yet my friends, there is plenty of work yet to be done to get the color nice and deep and glossy. Your hard work will pay off though as you will see in posts to come. So come back again, become a follower so you'll know exactly when a new post is published. Until then, be safe and be good.

Subscribe to:
Comments (Atom)