Tuesday, March 24, 2009

Carpet, Seats, Interior

First I want to thank you for coming back to check out my Mustang restoration. We are almost at the end of our journey here but please come back to see what else might be on the agenda for this blog.

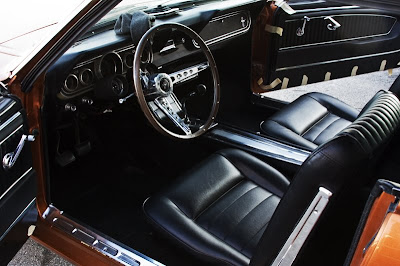
Ok, here you can see the installed carpet kit and the newly covered seats with pony trim. The door panels are on and the window and weatherstrips seals are installed. We are almost ready to take her down the road for a long awaited cruise.

The carpet kit was pretty straight forward. Lay it out in the sun to allow it to relax and unfold. Doing so will make installation easier. I used an industrial strength carpet spray adhesive on top of the sound deadener. The carpet was pressed into place starting from the rear seat area and moving forward.

Then the seats were installed using an awl to find the holes from under the car. Pretty easy. The hardest part was trying not to scratch, scrape, rip, or tear anything.

On to the pics and I will post some last follow up pics of my car completed.


Tuesday, March 17, 2009

Sound Deadening to the Gluteus Maximus

Now get ready for a modern marvel of advanced engineering. Imagine how sweet it'd be if these cars shipped with this stuff. So you might be tempting yourself to call this Dynamat because you've heard of it and you think they are the only ones clever enough to make this stuff. Well, let me enlighten you. Because my restoration budget did not facilitate spending $250 for a square foot of Dynamat, I harnessed the power of the web and found something just as good at significant cost savings. After doing my research I found this stuff at $14 for a 25' x 6" roll. The savings, I decided, would mean that I'd have to do more work, but as you may or may not be able to decipher by now, I'm always game for some real work.

Armed with my handy-dandy electrician scissors and a razor knife (don't use regular scissors on this stuff, you'll dull them out and trash your hands in an instantaneous instant) I charged up that great mountainous beast and laid down the law! I even went a step further and added some pieces of yute backed material under the front and rear seats. Take a close peek at the last two photogs.

Sound deadenation (yes, it's a word now) has been realized to signficant audible suppression detection spanning the full audio spectrum. Whatever than means. In layman's terms, I could tell the difference between before and after. So much so that I would recommend this upgrade if you are considering doing this to your vehicle. It will work on any type or make or model of car and you will be very happy with the results. In addition, if you are the person that drives a "boom-boom car" that does more rattling than boom-booming, use this stuff. You will be happy and so will we and so will your car.

Feast your eyes, take a peek, send me a question or comment.


Monday, March 16, 2009

Tackling the innards - Part 2

Once your floor and trunk (inner gardens) have been rust treated (weeded) we are ready to introduce our best defense against rust (pests). The beauty of what you are about to see is not, contrary to popular belief, the sweet, rich, black bedliner material that we sprayed. It is the fact that you will probably be good to go with this setup for another 44 years. That will make me 79 and so I sincerely hope that computers will progress at the rate that they have been so we don't have to do so much typing just to get a blog post done. Perhaps we will be able just to think our thoughts and BAM! your post will be written out, photogs uploaded, and spell checked in an instantaneous instant. Yeah, would be FAST!

The bummer about this spray-on bedliner is that you can't spray your own innards to keep them rust free for years to come. But alas, that is a whole other blog subject for a later date.

Ok, back to the task at hand. Thinned out spray-on bedliner was applied to the entire floor and trunk. This liner helps prevent water penetration, it seals the bare metal floor from the elements, and it will provide a layer of sound resistance between you and the road. Benefits abound!

But come back to watch me take this beast to a whole 'nuther level. I am a post away of showing you what real sound deadening is all about. Hang in there, we are almost to those sweet seats, carpet, and of course, the first ride down the open road!

And now on to the pics!


Wednesday, March 11, 2009

Let's tackle the innards now

Ok, we have the outside of the dish pretty clean and tight, now we aim our sights for the inside. If you've been following this project you will recall how much time and energy was spent getting the outside to shine. Well, the inside is even more difficult than the outside. See, the outside can always be washed and waxed and made to look like new fairly easy. But the inside is a more complex task. You can't just go in and treat the rust and holes without doing some major work. Just think about the seats and the carpet and the console; all have to be removed to access the inside. So your work here is more precise and takes patience and meticulous attention to detail to be done right. Take your time and cultivate this garden, your rewards will be great compared to the work you put in.

After replacing the small floorpan behind the passenger seat it is sealed with seam sealer. Every rusty looking spot is brushed with rust-sealer and the whole floorpan is prepped for spray-on bedliner. The trunk had underlayment that was glued to the metal so armed with a razor blades and a can of adhesive remover the trunk was prepped for the bedliner treatment.

Take a gander at the photogs and see that the floor is prepped and ready to be sprayed. Come back to see the rest of the interior come into shape. Slowly but surely we will get it done!


Monday, March 9, 2009

Cleaning up the dish

This restoration journey has been awesome for me to repeat to you. Although this was started in November 2008 and finished just after the New Year, I feel like there are some emotions I didn't fully experience being in the middle of the mix. Now that it's over (a restoration project is never over, by the way) and my stress level has come down, it has been a real treat telling you my story.

About the title of this post: There was a very wise dude who said, "you clean the outside of the dish but on the inside it's full of leftover food, and mold, and dirt." Ok that's not verbatum but you get the idea. Imagine if I took the StangBeast and just cleaned it up on the outside but left the inside all rusty and dirty? That would not be cool... at all. I mean what would be the point of that? To show everyone a nice outside paint job? Hmmm.

So here we go, a few final pics of the outside of the dish before we get to that moldy part I was talking about.


Friday, March 6, 2009

In between layers of color


I mentioned in an earlier post that there were two coats of color and four coats of clear but I failed to mention all that over a coat of primer and another coat of primer-sealer. In between each coat of paint/primer/sealer there is a significant amount of work to be done.


Sanding, wet sanding, and sanding, wet sanding over and over and over and over. By the end of this segment you should be feeling like Daniel Laruso did in that movie when he washed and waxed those sweet antique cars.

So this is what your car looks like in between coats of color. What? You were expecting it to be all shiny and glossy, perfect and ready for the show circuit huh? Not yet my friends, there is plenty of work yet to be done to get the color nice and deep and glossy. Your hard work will pay off though as you will see in posts to come. So come back again, become a follower so you'll know exactly when a new post is published. Until then, be safe and be good.